I Stopped Doing the 3-2-1 Method for Ribs: Here's What Happened
Achunchigan LattoreI Stopped Doing the 3-2-1 Method for Ribs: Here's What Happened
For years, the 3-2-1 method was my go-to for smoking ribs. You know it: 3 hours smoke, 2 hours wrapped, 1 hour unwrapped. It's a classic for a reason, often delivering tender, fall-off-the-bone results. However, as I've progressed in my barbecue journey, experimenting with various smokers and techniques, I'd question whether it's truly the best approach for every setup or every rib. So, I stopped. And here's what happened when I tackled a rack of spare ribs on my trusty Oklahoma Joe's Longhorn Reverse Flow offset smoker.

Part 1: Oklahoma Joe's Longhorn Reverse Flow
This is the first in a series where we'll be exploring rib perfection across a variety of my smokers. I'm lucky enough to have a diverse collection, and each one brings something unique to the table. We'll be diving into the nuances of cooking ribs on the:
-
Oklahoma Joe's Bronco Pro: A fantastic drum smoker, known for its consistent heat and efficiency. This is actually my favorite smoker for ribs. Matter of fact, for everything. Later in the series, we will dive deep into this.
-
Oklahoma Joe's Firecraft: A versatile Argentina-style live fire grill that offers an incredible intro into live fire cooking. It is the perfect segue into Santa Maria-style cooking without the commitment to that price tag.
-
Weber Kettle 22" and 26": The iconic charcoal grill, proving that simple can be sublime for smoked ribs. Both kettles cook differently, but the size is the main difference.
-
Weber Searwood XL: A high-performance pellet grill, offering convenience without sacrificing flavor. No need for smoke tubes, or “super smoke”, just straight up high quality and performance from day one.
-
Weber Summit Kamado E6 Charcoal: A premium kamado with exceptional insulation and searing power. Ribs on this one can be a little tricky. Take your eye off the ball for a minute and you could be overcooked.
But today, we're focusing on the heart of my outdoor kitchen: the Oklahoma Joe's Longhorn Reverse Flow offset.

The Oklahoma Joe's Longhorn Reverse Flow: My Workhorse
The Longhorn Reverse Flow is a beast of a smoker, and it's where I truly learned the art of fire management. Its reverse-flow design means the heat and smoke are drawn from the firebox, under a baffle plate, and then recirculated over the food inside the cooking chamber before exiting the stack. This creates a remarkably even cooking temperature across the grates, minimizing hot spots and ensuring a consistent cook. It takes a little more active management than some other smokers, but the results – that deep, smoky flavor and beautiful bark – are absolutely worth it. It’s the true pinnacle of flavor, demanding respect and rewarding patience.
Rib Prep and Fire Management: A Sneak Peek from My Book
If you're looking to master your offset smoker and truly elevate your barbecue game, I've got you covered. My book, Wrangling Fire, available on Amazon, dives deep into all aspects of fire management and, of course, my signature rib preparation process.
Rib Prep Synopsis:

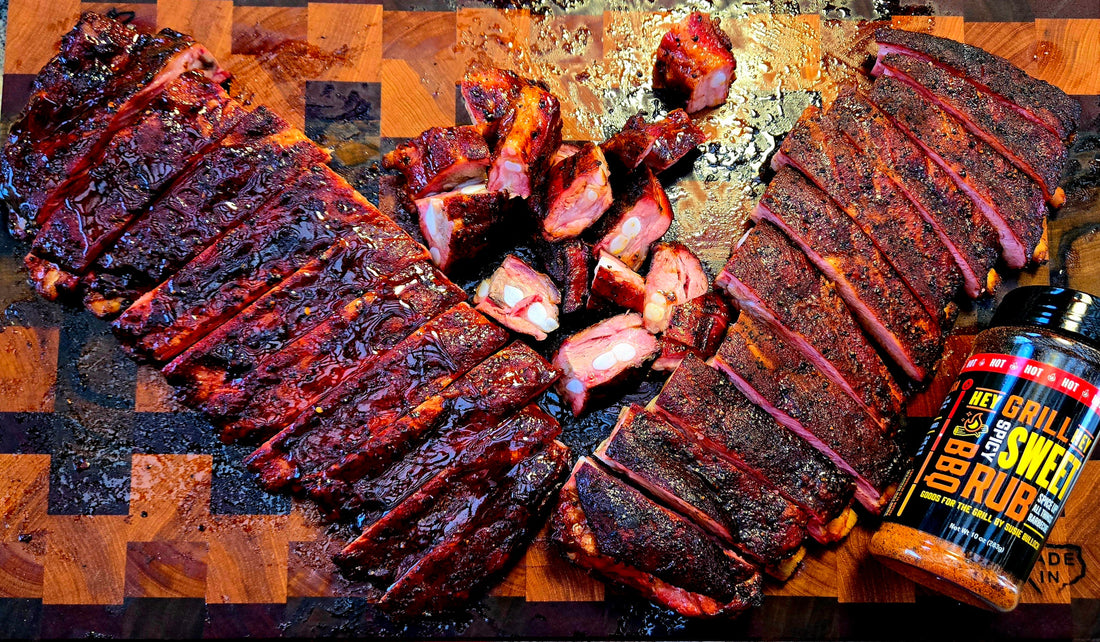
My rib prep starts long before they hit the smoker. It’s all about building layers of flavor. First, I always remove the membrane from the back of the ribs when smoking – this is crucial for the texture I like on a finished rib. Over live fire, though, I keep the membrane on because it crisps up well. Next, skip the binder as it is one of the most useless steps. Rub to the meat is all you need. Let it sit for two minutes, and it should adhere sufficiently to the meat. I am using the Sweet and spicy BBQ rub from Hey Grill Hey for this cook, but your favorite BBQ rub will do just fine—no injections, no brining, just a perfectly seasoned rack ready for the smoke. I also prefer to take my meat from the fridge, season it, and smoke it without letting it reach room temperature, unlike some who do. Why? Cold meat takes on more smoke.

Fire Management Synopsis:
Running an offset smoker like the Longhorn Reverse Flow is an art. It’s about understanding airflow, fuel, and how to maintain that "thin blue smoke" that signifies a clean burn. I prefer to use primarily oak and hickory splits, carefully adding them to the firebox to keep a steady temperature, typically between 250-275°F (120-135°C) for ribs. It's a dance of opening and closing vents, adjusting the firebox door, and learning the unique airflow of your specific smoker. My book walks you through building and maintaining a stable fire, reading your smoke, and making those subtle adjustments that lead to barbecue nirvana. For my setup, I use a small fire and 1-2 splits at a time to maintain. Typically, I start with a ½ chimney of B&B Oak Lump Charcoal to get them going.

My Rib Method: What Happened When I Ditched 3-2-1
So, back to the ribs. With my Longhorn Reverse Flow purring along at a consistent 275°F, and a beautiful thin blue smoke rolling, I placed my perfectly prepped spare ribs directly on the grates.
Instead of a rigid timeline, I focused on feel and visual cues. This meant letting the smoke work its magic for at least 3 hours, or until I saw that deep mahogany bark forming. I wasn't watching the clock; I was watching the ribs. I typically keep the smoker closed for the first two hours before I even peek at them.
Now we are looking for the bark formation, as well as seeing how the ribs are cooking. Some ribs are smaller, more thin than others, so look at how they are cooking and see if you need to move them around. Continue to let them cook, and no, we do not spray around here. After three hours or more, this is where you want to see how the ribs are feeling. Pick the rib up, with some gloves of course, and see how they are bending. More bendy, more tenderness. Usually, around 3 ½ hrs in, I will sauce if that is the plan of action. For this cook, I went with the DQ Glaze from Duce’s Wild BBQ. This will give me an even, glossy coat, and it will only add sweetness to my rib since the rub is already fairly spicy as is.
Finally, we are on the homestretch. At this point, it is all about feel. The glaze will set in about 30 minutes, but tenderness is what we are after. We want the ribs to bend without breaking because they are very tender, but not tender enough to fall apart. You can also use a toothpick to poke the ribs in between bones to see how they feel. Anytime around the 4 ½-hour mark, the ribs should be done, or nearly so. Now, if you want them to fall off the bone, take them another 30-45 minutes. I personally think that’s overcooked for ribs, but you are allowed to like what you like.
The Result?
The ribs I pulled from the Longhorn Reverse Flow were, quite simply, incredible. The bark was phenomenal – a rich, dark mahogany with just the right chew. The smoke ring was deep and vibrant. And the tenderness? They passed the bend test beautifully, holding together when picked up, but yielding perfectly with a gentle bite. No fall-off-the-bone mush here; just perfect, juicy, flavorful ribs that held their structure.
This method, focusing on the ribs themselves rather than a strict clock, yielded a far superior product for this smoker and my preferences. It allowed the bark to truly develop, and the tenderness was spot-on without overcooking.
What's Next?
This is just the beginning! In the coming weeks, we'll be taking on ribs on the Oklahoma Joe's Bronco Pro, the Weber Kettle, and all the other smokers in my arsenal. Each one will offer a unique challenge and opportunity to explore the endless possibilities of barbecue. If you haven’t yet, check out my rubs here.
In the meantime, I'd love to hear your thoughts! Have you ditched the 3-2-1 method? What are your go-to techniques for ribs on an offset smoker? Let me know in the comments below! And don't forget to check out my book on Amazon for all the in-depth details on fire management and rib prep. Happy smoking!
